
Sprint retrospectives
Updated
The Retrospective tab runs a retrospective for a sprint, for a board without sprints, or for the space when it has no board, inside a planning session. You and the other participants add notes to three columns, like the notes you agree with, group related notes, and turn notes into action items. The notes stay face down during Feedback, which is the first stage, and are revealed in the Vote stage, except your own notes, which only you can see.
The retrospective is virtual: notes, groups, stages, and the timer stay in Scrumpy. Jira changes only when you select Apply, which creates or updates the Jira work items for your action items.
Before you start
- The space does not need a board. A Scrum board with sprints, a Kanban board, or a Scrum board without sprints works too. With no board at all, the retrospective saves its notes, timer, action items, and type for the planning session itself.
- A planning session must exist. Create one from the Refinement/grooming tab, the Capacity planning tab, the Standup tab, or the Retrospective tab.
- Each sprint of a board, each board without sprints, and a planning session without a board has its own retrospective: its own notes, timer, action items, stage, and type. A change in one never reaches another.
- Moderators choose the shared board, retrospective type, and sprint when the board has one. Locked participants follow that selection.
Choose the board and sprint
- Open the Retrospective tab.
- Pick a planning session from the tabs above the retrospective board. When the session you last opened is no longer available, the first planning session opens instead.
- Pick a board in the top left corner.
- Pick a sprint next to the board. The list shows the six most recently started sprints of that board. A sprint that has not started yet is not listed. If the board has no started sprint, the sprint selector is hidden and the retrospective works for the board. A voter or guest can pick another sprint locally; that detaches the viewer from the moderator. Every sprint opens its own retrospective.
- The sprint name appears in the center, with its goal underneath. Use the link icon next to the goal to open the sprint in the Jira backlog in a new browser tab. A board without sprints hides the sprint name, the goal, and the link. A space without a board shows an empty disabled board selector and hides the sprint selector, and the retrospective works for the planning session.
Choose the retrospective type
Use the dropdown in the top right corner. The three columns change with the type:
| Type | Columns |
|---|---|
| The good / The bad / The ugly | The good, The bad, The ugly |
| Start / Stop / Continue | Start, Stop, Continue |
| Mad / Glad / Sad | Mad, Glad, Sad |
| Sunny skies / Hot air / Storm clouds | Sunny skies, Hot air, Storm clouds |
| What worked well? / What didn't go well? / What should we try next? | The three questions |
Switching the type only changes the column names. The notes stay in their columns. The new column names appear right away, and you can keep adding notes and using the actions while the change saves. If the change cannot be saved, the previous type returns.
The type belongs to the retrospective you are looking at. Each sprint keeps its own type, and so does a board without sprints and a planning session without a board. Switching the sprint or the board shows that retrospective's own type, or the default The good / The bad / The ugly when it never had one. Changing the type on one sprint never changes another sprint's columns.
Add a note
- Find the column you want. Its name sits above the retrospective board, centered over the lane.
- Select the add button with the plus icon under the column name.
- An empty note appears in the column and its editor is ready. Type your note.
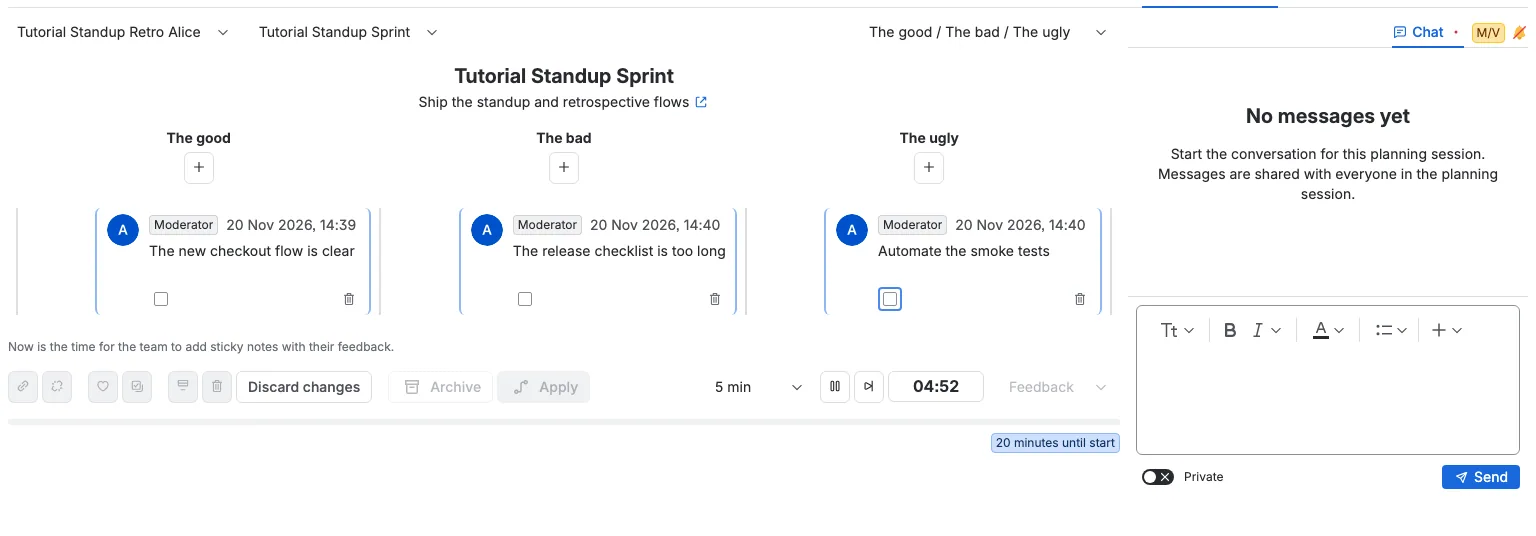
Your own notes are always visible to you, even during Feedback. Notes from other participants stay hidden during Feedback and are revealed in the Vote stage. The note sits in the retrospective board as a sticky card with the same layout as a chat message. Your own notes sit on the right of the column, and notes from other participants sit on the left. Each card shows the author and the author's role (Moderator or Voter), the time, the note text, and the actions you can use on that note. The role uses the same label as a chat message. A single note has no separate accent line inside the card; the card's rounded border is the only accent border, in blue for your notes and purple for notes from other participants. The cards use the same 8px vertical spacing as the standup work item cards. Notes in a group have a 20px gap before and after the group. Guests can read the notes but cannot add or edit them.
Read, edit, and like a note
- If you wrote the note, the card itself contains an editor. Change the text directly on the card and it is saved shortly after you stop typing. Only the author or a moderator can edit a note.
- Select the like button on a card to like a note. Select it again to remove your like. The button shows how many likes the note has. You can like notes in the Vote stage. In the Actions stage the like button and its count stay on the card but are read-only, so you can still see the totals. The like button, and the delete button on notes you wrote, sit at the right edge of the action row for every participant, close together.
- A group shows one like button with the sum of its notes' likes. A new like is added to the first note in the group. If you already liked a note in the group, selecting the group like removes your like from the first note you liked.
- The delete button on a card asks for confirmation, then removes that note, only if you wrote it. A group has one delete action that removes every note in the group, and only a participant who wrote every note in the group can use it. A note that belongs to an action item keeps its text and editor, but its like is disabled until the action item is removed. Grouping is still available; grouping linked notes adds the whole group to their action items.
Select several notes
Each card has a checkbox at the start of its action row. A moderator sees one on every card. A voter sees one on every card during the Vote stage, so they can like several notes at once, including notes written by other people, and only on their own notes in the other stages. A group has one checkbox in its action bar, and it selects every note in the group; it appears to a moderator, to a voter during the Vote stage, and to a participant who wrote every note in the group. Checking a note ticks its checkbox. The moderator's checked notes are filled with the light accent colour that matches their border, and every participant sees the same fill, even when they browse the retrospective locally. A voter's own checkbox only ticks, because the fill always shows the moderator's shared selection. A group is filled as one card when any of its notes is checked. The fill is stored with the retrospective, survives a reload, and is cleared when the sprint changes.
A moderator also has an Edit button at the start of the action bar, before Group notes. It opens the Edit planning session dialog, where you can change the title, description, and schedule of the planning session. The new values show on the planning tab and the progress bar right away. If the save fails, the previous values come back and a message tells you that the planning session could not be saved.
Select the checkboxes of the notes you want, then use the action bar below the notes and action items:
- Group notes is available to moderators. The selected notes in each column join one group. The button is enabled from the Vote stage on, when at least two selected notes are in the same column and at least one of them is not already in a group. If a selected note already belongs to an action item, that action item takes on the whole group's notes, authors, and likes.
- Ungroup notes is available to moderators. The selected notes in each column leave their group. The button is enabled from the Vote stage on, when at least one selected note belongs to a group.
- Like notes adds your like to every selected note. It is enabled in the Vote stage, including when the selection contains another participant's notes.
- Create action items uses the tasks icon and is available to moderators. It creates one action item for each selected note and one for each selected group. Notes that already belong to an action item, and groups containing one, are skipped. The action is enabled when at least one selected note or group is not already linked.
- Delete notes removes the selected notes you wrote. The action is disabled when the selection includes a note written by someone else, so a mixed selection is for liking only. The checked action items are removed with the separate action item delete action. A confirmation dialog appears before anything is deleted.
Grouped notes stay together and are separated from the rest of the column by a 20px gap. The whole group shares one comment card, one pair of left and right borders, one author header, and one action bar. The author header shows the first note's author and time. Each grouped note has its own editor inside the card; your own notes are editable and the other notes are read-only. Each note except the last is separated from the next by a 1px dashed bottom border in the group card's accent colour. The last note has no bottom border, so the group keeps one clean end, and a single note has no separator. The group action bar has one selection checkbox that selects every note in the group, one like button with the summed like count, and one delete action. The delete action appears only when you wrote every note in the group, and it removes every note in the group after confirmation. The group like and delete buttons sit at the right edge of the group action row, close together.
Deleting a note is disabled while the note belongs to an action item. Remove the action item first if you need to delete its source notes. Removing the action item leaves the source notes in the retrospective.
A moderator also has a Discard changes text button immediately after the delete actions, the same action the Standup offers. It asks for confirmation and deletes every note, action item, and the timer of the retrospective on screen, returning it to its initial state with its chosen type. Other sprints, other boards, and the planning session's other retrospectives keep their notes, action items, and timer. The Archive action sits after Discard changes with spacing before it, and Apply follows it and creates or updates Jira work items for every action item in the selected sprint that has a work item type other than None. Only a moderator sees Discard changes and Apply. Discard changes is disabled when the retrospective on screen has no notes, no action items, and an untouched timer, and it stays disabled while the discard is being saved. Apply is available when at least one action item has a work item type other than None and is new or has changed since the last Apply, even when no rows are checked. After a successful Apply it is disabled until an action item changes.
See your notes in the Status and Assignee tables
From the Vote stage on, the right side panel has two more tabs, Status and Assignee. Both tables list the notes of the retrospective. A group is one row, with the first line of each note shown one under the other and separated by a dashed line. A row shows a checkbox, the author, and the first line of the note, cut with an ellipsis when it is longer.
- Status groups the notes by the three columns of the retrospective type.
- Assignee groups the notes by the person who wrote them. A group sits under the author of its first note.
A checkbox in a table is the same checkbox as on the note. Selecting a row selects the note on the board, and selecting a note on the board selects its row. A group row selects every note in the group. A voter can select their own notes outside the Vote stage and any note in the Vote stage.
Drag a row into another section to move it. In Status, a section is a column, so the note moves to that column; inside its own section it changes only the order. In Assignee, a section is one author, so this makes that person the note's author. Grouped notes move together. Only a moderator or the note's author can drag a row; another row returns to its place with a message. A column can hold at most 200 notes, so a move into a full column is refused.
The tables appear in the Vote and Actions stages. During Feedback they are hidden, because another participant's note is still face down.
Changing a note's author also changes the role shown on the note and the Authors column of every action item built from it. The move saves right away, so there is nothing to Apply. When you are ready, Create action items in the action bar is the blue primary action.
Turn notes into action items
A moderator selects one or more notes or groups, then selects Create action items in the note action bar. The button is enabled when at least one selected note or group has no action item yet. Only those unlinked notes and groups create rows; the ones that already have an action item are skipped. The action items appear in a table above the action bar. A centered Action items heading sits above the table, with a short line below it that reads "Follow-up action items based on the team retrospective notes." The heading is smaller than the sprint or board name and is hidden when the table has no rows. The table stretches across the left content, and the selected action item's details are in the Details tab of the right side panel when the action item has no voting tab. While no action item is selected, the side panel has no Details tab. A moderator can drag a row to change the order of the action items. Everyone sees the new order right away, and the Confluence archive writes the action items in that order.
- One selected single note creates one row.
- One selected group creates one row. The row uses the group's first note as its summary and lists every author in the group.
- The Type column header is the work-item icon, and the next column is headed Work item. Its cells show the same issue key link as the planning session tables, with the action item summary on hover. For a moderator, the matching work item type icon comes before the compact dropdown, and the header icon and the type icon are left aligned. The dropdown starts with None, which is not the default. When None is selected, the icon becomes an empty space of the same width so the cell does not resize. For a voter or guest, the Type column shows only the work item type icon and uses the minimum width, and their first column is a new empty column that marks the action item the moderator selected. The remaining columns show the summary, the authors, the total likes of the source notes, and the estimate. The Summary column cells show the summary without a Summary label.
- The last column is headed Estimate. It shows the linked work item's current estimate in the selected board's unit: story points for a numeric board and a work-day duration for a time board. The cell stays empty for an action item without a Jira link or without an estimate. The column is hidden when the board has no estimation field.
- For everyone else the type cell shows only the work item type icon, with an empty space of the same width when the type is None, and the header icon and the type icon are centered in their column. The Type column for a voter or guest uses the minimum width. A moderator changes the type in the dropdown; the icon updates immediately, and if the change cannot be saved, the previous type returns.
A moderator sees a checkbox column for selection and a radio column for choosing the shared row shown in the Details tab of the side panel. The radio column header uses the same presenter mode icon as the single selection column of the Refinement and grooming tab. Everyone else sees the same radio column, and their first column is an empty column of the minimum width that shows a warning M badge on the action item the moderator selected, with a tooltip that names it, like the Refinement and grooming table. The badge follows the moderator's current selection even while you browse the retrospective locally. While you are locked to the moderator, your radio follows the moderator's row. Select another row's radio to browse that action item yourself: the choice detaches you from the moderator, appears only in this browser tab, and leaves the moderator's shared row unchanged. Selecting another action item by the moderator does not replace your local row while you stay detached. Selecting an action item with its checkbox also selects the notes that were used to create it. Choosing another radio button replaces the summary and description in the Details tab with the newly selected action item. The like count in the table is shown in a purple lozenge with no icon. The Summary column in the table shows plain text. Edit the summary in the Details tab while no voting tab is shown; only a moderator can change it there.
The action item details show a Summary label and a Description label above the two fields. Only a moderator can edit the summary, the description, and the work item type. The summary uses the same inline text field as a work item summary in the Details tab. The description uses the same editor as a work item description. Voters and guests see the action item details read-only. The type dropdown starts with None, then lists the work item types of the board's project, without subtasks. The first Jira work item type remains the default.
The action bar below the action item table controls both kinds of selection:
- Delete action items uses the table-row-delete icon and removes only the checked action items after a confirmation dialog. It is available to moderators. The source notes stay in the retrospective when you remove an action item. A Jira work item that was already created stays in Jira.
- Apply creates a work item for every action item in the selected sprint that has a work item type other than None and no Jira link, and updates the linked work item for every action item that has a type and a link. It is available to moderators. Action items with None are skipped entirely, so no Jira work item is created or updated for them. The checked rows do not limit it. It is a text button immediately after Archive, and it is available only when at least one action item has a work item type other than None and is new or has changed since the last Apply, so a second Apply without an edit stays disabled. New work items are added to the project backlog. If some rows fail, the retrospective shows a warning and the successful rows keep their links. A small hint below the action item table explains that Apply creates or updates Jira work items from the action items and that estimation becomes available once a Jira work item is created from an action item. The hint appears to moderators only, when at least one action item has a work item type other than None.
The action bar sits directly below the action item table, with the planning progress bar directly below it and a space.200 vertical gap between them. This is the same placement as the action toolbar in the capacity planning tab.
The timer
The countdown clock sits at the right of the action bar below the retrospective board. A moderator also sees the controls there, with the clock to the right of the fast-forward button. Everyone sees the clock.
- A moderator chooses 1, 3, 5, 10, or 15 minutes. Choosing a duration resets the countdown.
- The first note you add in Feedback starts the countdown automatically with the selected duration. Anyone in the team can start it this way. The stage then locks until the countdown ends or a moderator fast-forwards it. If the countdown was already started or paused, adding a note does not restart or resume it.
- The play button starts the timer, pauses it while it runs, and resumes it when paused. Only a moderator sees the duration selector, the play button, and the fast-forward button.
- A moderator can use the fast-forward button to end the countdown and move to the next stage right away.
- The remaining time is shown in a large rounded box. When the countdown ends, the same box shows that time is up.
- The clock updates every second.
- While the stage is Feedback, the cards written by other participants keep their layout but hide the note text and the like button. Your own note keeps its text and editor. Grouping and ungrouping are disabled in Feedback; creating action items is enabled only in the Actions stage. Delete stays available.
- When the countdown reaches zero, the stage moves to Vote and the note text is revealed. The text appears for everyone at the same time, including the person who changes the stage. Your own notes stay visible all the time.
- In the Vote and Actions stages the timer is just a timer. A moderator can start it again at any time to timebox the discussion without hiding the notes, except in the Actions stage where the timer controls are disabled.
The progress bar under the action bar shows how far the planning session is from its start and end dates. It ends to the left of the side panel.
Stages
The Stage dropdown sits after the timer controls in the action bar. Its three stages are grouped under the Stage label inside the menu:
- Feedback is the default. You can add notes. Grouping, ungrouping, likes, and creating action items are disabled.
- Vote disables new notes. You can like notes. Creating action items is disabled.
- Actions disables new notes and likes. Like buttons and counts stay visible but cannot be selected. A moderator can create action items. The countdown controls are disabled.
A small line below the notes explains the current stage. Everyone sees it. In Feedback it invites the team to add sticky notes with their feedback. In Vote it explains that this is the time to collect which notes are worth creating action items from. In Actions it explains that notes can be grouped by common meaning and action items created from the most-voted notes.
A moderator switches the stage. Everyone else sees the current stage in the dropdown but cannot change it. The stage is remembered with the retrospective and survives a reload.
While a countdown has started and has not ended, the stage is locked. When the countdown ends or is fast-forwarded, the next stage is selected automatically. The notes are revealed when you leave Feedback, and they are hidden again if you go back to Feedback.
An action item shows the total likes of all its source notes. When the action item comes from a group, this includes every note in the group. Grouping notes later also adds the whole group's notes, authors, and likes to every action item already linked to a note in the group. Ungrouping keeps the action item linked to the notes and keeps the total.
Archive and complete
A moderator can archive the retrospective to Confluence with the Archive button before Apply in the action bar. It is available in the Actions stage, because the notes stay hidden from everyone until the team reveals them. The archive writes the notes, the participants, and the action items of the selected sprint to the page, and it creates or updates the page. It does not close the planning session. See Archiving to Confluence for the page contents.
The danger-colored Delete button, above the session tabs beside Create, closes the planning session. It asks for confirmation, then permanently removes the planning session and its notes, action items, standup, and chat.
Details and chat
The right side panel has a Chat tab on the right. When an action item is selected and it has no voting tab, a Details tab appears on the left. The Details tab shows the selected action item. While no action item is selected, the panel shows only the Chat tab. The Chat tab holds the full session conversation: every message sent from the planning session, plus messages sent from outside the session for the work items the retrospective shows, including the work items linked from action items, ordered by time. A work item message shows its work item key as a small link at the start of its action row; select it to open the work item in Jira. When you select an action item that is linked to a Jira work item, the messages you send go to that work item chat, and the message shows the work item key as a small link. With no action item selected, with an action item that has no Jira link, or when you cannot open the linked work item, the messages go to the planning-session chat. The planning conversation belongs to the planning session, so it is the same chat in every tab that opens that planning session.
When the selected action item is linked to a Jira work item, the side panel also shows a voting tab for every perspective whose estimation uses the board in the board selector. The voting tabs appear before Chat. Each tab opens the voting panel for the linked Jira work item. A voting tab already shows the linked work item details, so the Details tab is hidden while at least one voting tab is shown. An action item without a Jira link shows no voting tabs. Changing the board selector changes the voting tabs to that board's matching perspectives. When you accept an estimate in a voting tab, the linked action item's Estimate cell shows the new value right away, and every other participant sees it as soon as the accepted estimate reaches them.
The side panel is 400px wide and starts at the top of the planning session content, level with the board and sprint selectors. The Details tab is selected by default when it is shown. When a voting tab is shown, the panel opens on the first voting tab. The moderator's chosen tab is part of the shared retrospective data, so locked participants follow it. A yellow M badge marks the tab the moderator has open: Details, a voting tab, or Chat. Every non-moderator sees it, whether they follow the moderator or browse on their own. The retrospective type selector sits at the end of the board and sprint row, immediately left of the side panel.
- Moderators and voters can send public or private messages. Guests can send public messages and cannot see private messages.
- Work item messages appear next to planning messages by their sent time. They stay available for 72 hours and are hidden when you cannot open that work item in Jira.
- When you send a message right after your own previous message, the new text is added to that message after a single newline. The combined message keeps one author header, one time, and one action row. Editing it edits the combined text. A message from another participant, a private or public change, or a role change starts a new message.
- Messages can be edited or deleted by their author, and can be reacted to with thumbs up or thumbs down.
- The side panel stretches to the height of the retrospective content. The note columns, action item table, and progress bar stay to its left.
The bell at the right of the Details and Chat tabs, after your role badge, controls sound notifications for the timer and the chat. Select it once to turn sound on. The bell starts muted.
Follow the moderator
Voters and guests start locked to the moderator. While locked, you follow the moderator's action item, sprint, retrospective type, and side panel tab. The checked-note highlight is always shared, even while you browse locally. The moderator's changes arrive right away. You also follow the moderator's space page tab, so the page moves between Refinement/grooming, Capacity planning, Standup, and Retrospective for the same planning session.
- Lock to moderator applies to the planning tab you are on. Switching to another planning tab yourself clears it, so you start detached on the new tab. A move caused by the moderator's tab change keeps it checked.
- Clear Lock to moderator to browse on your own. You can pick another tab, pick another sprint, or pick another action item. Your action item choice applies only to you and is not shared with the team. Your choices stay with this tab. The shared board and retrospective type stay moderator controlled.
- Picking another tab, sprint, or action item while locked also detaches you.
- Check Lock to moderator again to discard your local choices and follow the moderator. The sprint and board return to the moderator's shared choice.
- The lock is remembered in this browser tab while you stay on the tab.
Changes appear for everyone
Every note, like, group, action item, and timer change is saved for the planning session and appears for the other participants right away. If the connection drops, the tab reloads the current state when the connection returns.
Most changes appear in your own view immediately, before the server answers. This includes the timer duration and controls, the Stage, adding and deleting notes, likes, groups, action items, and Discard changes. Confirmation dialogs close as soon as you confirm. If a change cannot be saved, the previous state is restored and a warning appears. The controls stay available while the change is being saved.
A like you give or take back stays as you left it. A slower copy of your earlier like never adds it back, and other people's likes still appear as they give them. If a like cannot be saved, only the likes from that click go back to how they were, and your other notes stay as you left them.
Retrospective data is kept for 72 hours after the last change. Older retrospective data is removed automatically.