
Running a retrospective
Updated
A retrospective takes minutes to set up and keeps the whole team on the same page at the end of a sprint. Add notes to three columns, like the ones you agree with, group the related ones, and turn the best of them into action items that become Jira work items.
Pick the planning session, board, and sprint
Open the Retrospective tab and pick a planning session from the tabs above the retrospective board. Pick the board, then the sprint that just ended. The last six started sprints are listed, so the sprint you want is normally the first one. When the board has no started sprint, the sprint selector is hidden and the retrospective works for the board. When the space has no board, the retrospective works for the planning session. The type dropdown on the right changes the three column names, for example Start / Stop / Continue.
Guests can read the retrospective. Moderators and voters can add notes and like them.
Add a note to each column
Under each column name, select the add button with the plus icon. An empty note appears and its editor is ready, so you type straight away. Your notes sit on the right of the column and the notes from other participants sit on the left.
During the Feedback stage the notes from other people stay face down, so nobody is influenced by what the others wrote. Your own notes stay visible to you.
Like and group the notes
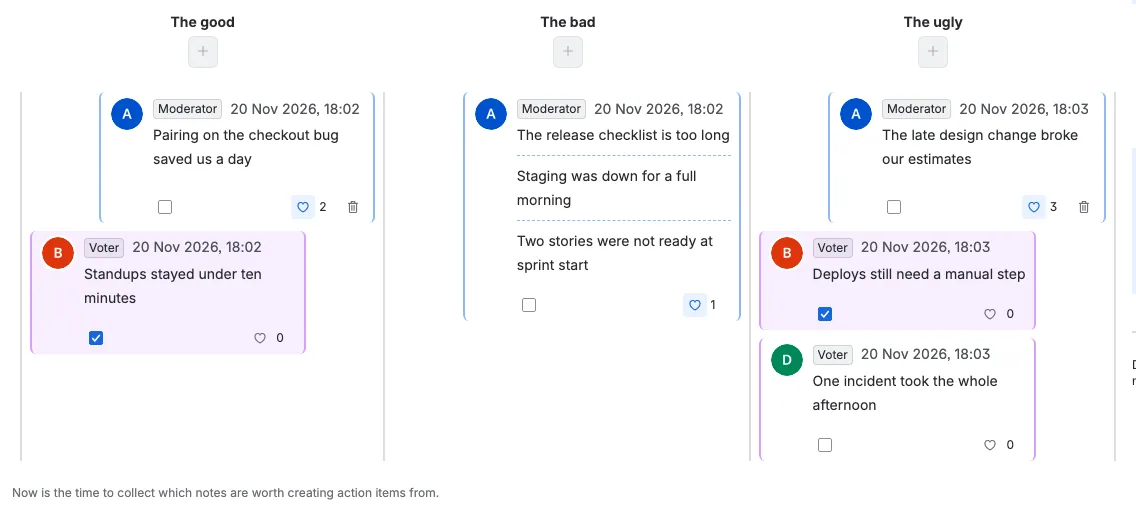
Switch the Stage to Vote when the team has finished writing. The notes are revealed and everyone can like the ones worth acting on. The like button shows how many people agree, and in this example three voters took part, with one, two, and three likes on different cards.
Select several notes in the same column, then choose Group notes. Related notes join one card, and the group keeps one like count for all of them. Grouping is available from the Vote stage on and is disabled during Feedback. In the middle column three notes are grouped into one card, so the discussion stays together.
A moderator can also highlight notes without grouping them. A highlighted note is filled with the light accent colour, and everyone sees the same fill. Here two notes are highlighted for the discussion.
Follow the same notes in the Status table
The Status tab at the left of the side panel shows the same retrospective as a compact table. The Status and Assignee tabs appear from the Vote stage on. The three columns are wide bucket rows, and the notes of each column sit under their column in board order. A row shows the selection checkbox, the author, and the first line of the note, shortened with an ellipsis. A group is one row, with the first line of each note stacked and separated by a dashed line.
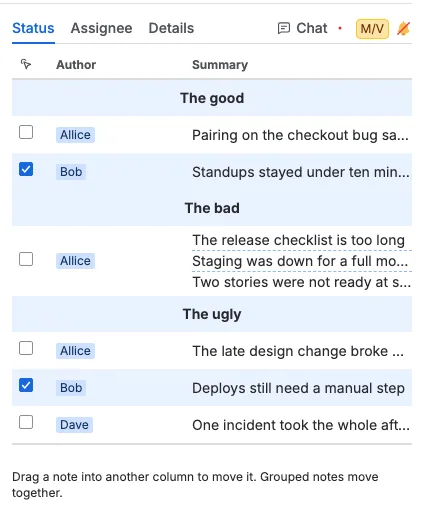
- Drag a row into another column to move the note there. Dragging inside its own column changes only its order. Grouped notes travel together as one row.
- A moderator can move any row, a voter only their own notes, and a guest reads the table. A row the viewer may not move returns to its place.
- A column holds at most 200 notes, so a drop into a full column is refused and the row returns.
- The checkbox is the same selection as on the board. Ticking a row ticks its note on the board, and ticking a note on the board ticks its row. A group row ticks every note in the group. Select notes here to group them or to create action items from them.
Walk the notes person by person in the Assignee table
The Assignee tab follows Status. It groups the same notes by the person who wrote them, in the order the authors first appear on the board. A group sits under the author of its first note. Each person is a wide bucket row, and their notes sit under it with the same columns as the Status table.
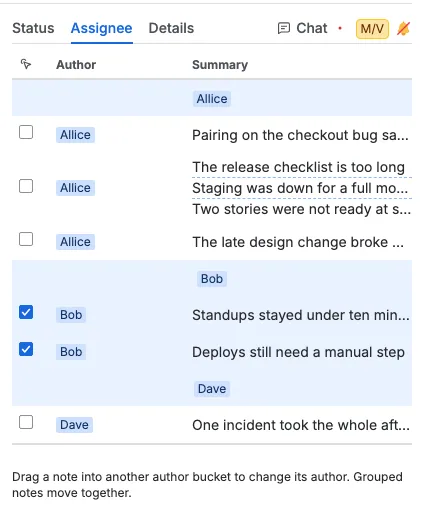
- Drag a note into another person's bucket to make that person its author. The note header on the board changes right away. A group moves together, so every note in the group takes the new author.
- A moderator can reassign any note. A voter can reassign only their own notes. A guest reads the table.
- You can drop a note only under a person who already has a note in the retrospective, because only they have a bucket.
- The checkboxes and the shared selection work the same as in the Status table, so you can select notes here too.
Turn notes into action items
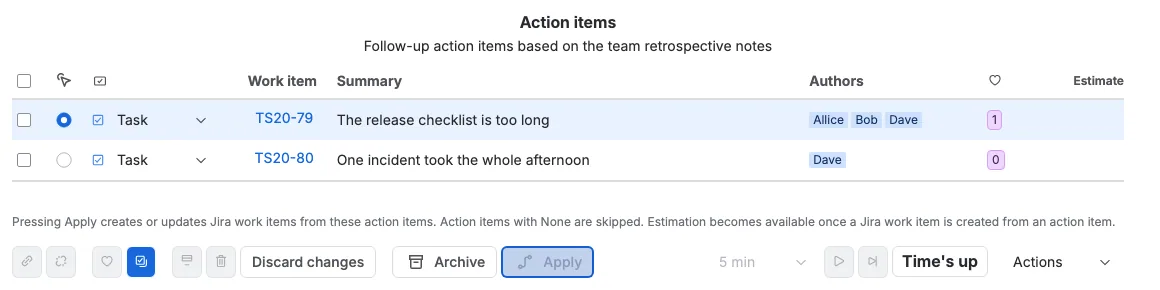
Switch the Stage to Actions. Select a note or a group, then choose Create action items. Each selected note or group becomes one row in the action items table, with the note text as the summary and the authors and likes beside it. Drag a row to change its place in the table. Everyone sees the new order, and the archive keeps it.
For each row, pick the Jira work type in the Type column. Then press Apply. Scrumpy creates a Jira work item for every action item with a work type and links it in the Work item column. Action items set to None are skipped, and a second Apply without an edit stays disabled. Once a Jira work item is created from an action item, its estimate appears in the Estimate column and you can estimate it in the voting tabs next to Chat.
Discard changes sits before Apply and appears to a moderator. It asks for confirmation and removes every note, action item, and the timer of the retrospective on screen. It is disabled when the retrospective has nothing to discard. The Chat tab in the side panel holds the full planning session conversation, including messages from the work items your action items link to.
Guide the session with stages and the timer
The Stage dropdown sits in the action bar with the countdown. Feedback is for writing, Vote for choosing, and Actions for turning notes into work. A line below the notes explains what the current stage is for, and everyone sees it. Only a moderator changes the stage.
A timer keeps each stage inside its timebox. The first note you add in Feedback starts the countdown, and while a countdown runs the stage is locked. When the countdown ends, or when a moderator presses the fast-forward button, the stage ends early and everyone moves to the next one. In the Actions stage the timer controls are disabled.
When the team is done, Archive saves the retrospective to Confluence. It is available in the Actions stage only. Complete closes the planning session and removes its notes, action items, standup, and chat.